
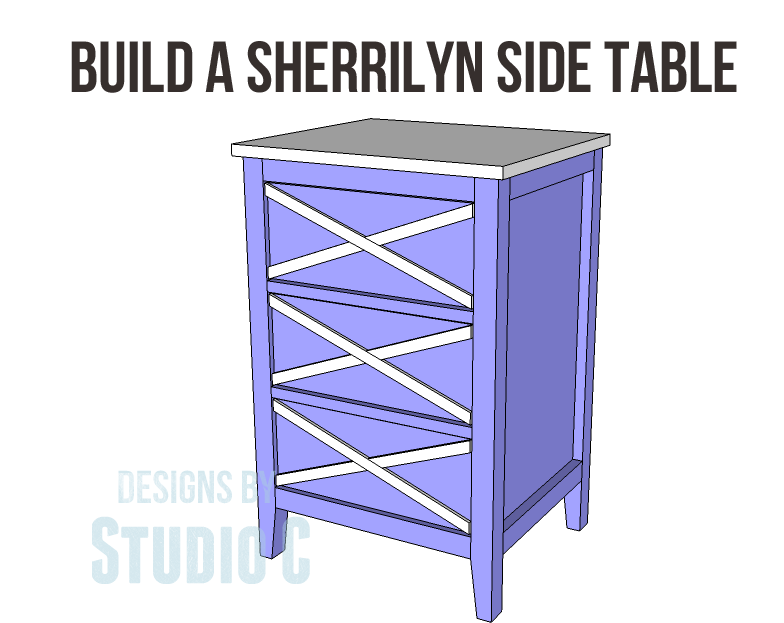
Build a Sherrilyn Side Table
An Easy to Build Side Table with X Detail on the Front
This is the neatest side table… I love the “X” detail on the drawers as well as the ample storage! The free DIY woodworking plans to build a Sherrilyn Side Table would be great in a craft room, entryway, or a kiddo’s room plus it is an extremely easy build!
Materials:
- 1-1/4″ pocket hole screws (<– affiliate link!)
- 2-1/2″ pocket hole screws
- 1/2″ brad nails
- 1-1/4″ brad nails
- 1-1/4″ screws
- Edge banding, if desired (<– affiliate link!)
- 3 sets of 12″ drawer slides
- 3 cabinet pulls
- Finishing supplies
Lumber:
- 3 – 1/4″ craft boards at 3′
- 1 – 1×2 at 3′
- 3 – 2×2 at 8′
- 1 sheet of 3/4″ plywood (PureBond plywood would be perfect for this project!)
Cut List:
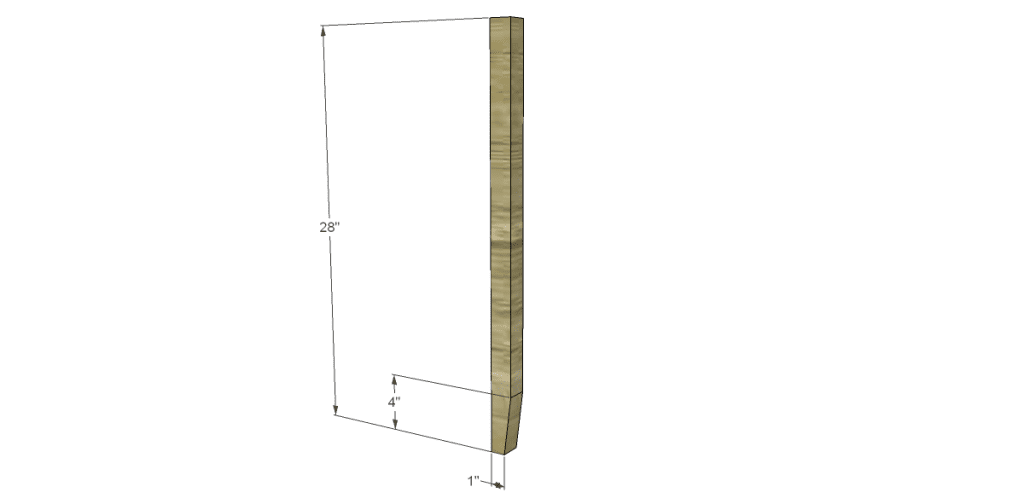
- 4 – 2×2 at 28″ – Legs
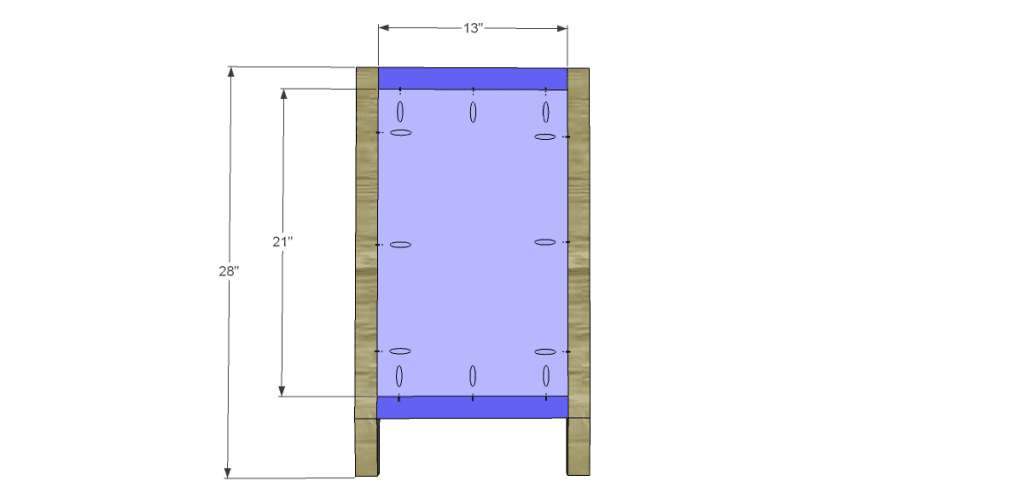
- 4 – 2×2 at 13″ – Side Frames
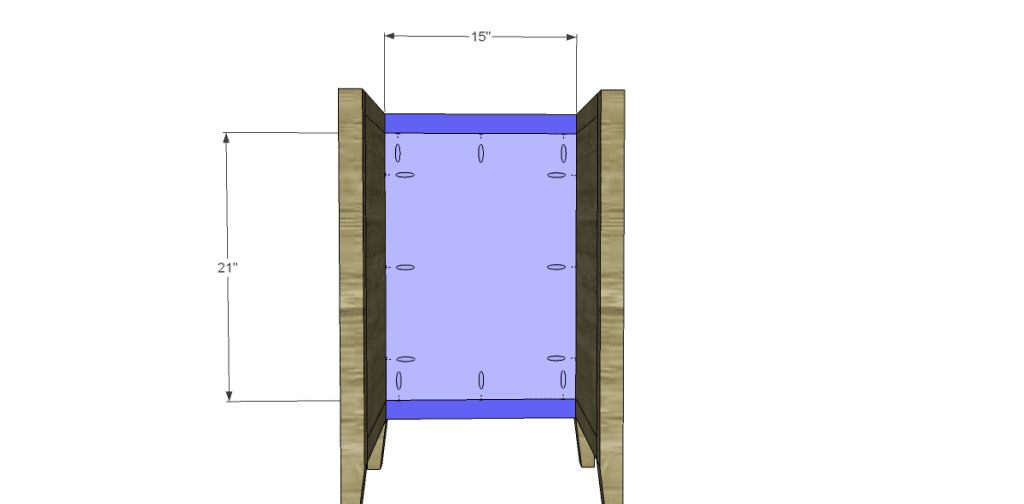
- 2 – 3/4″ plywood at 13″ x 21″ – Side Panels
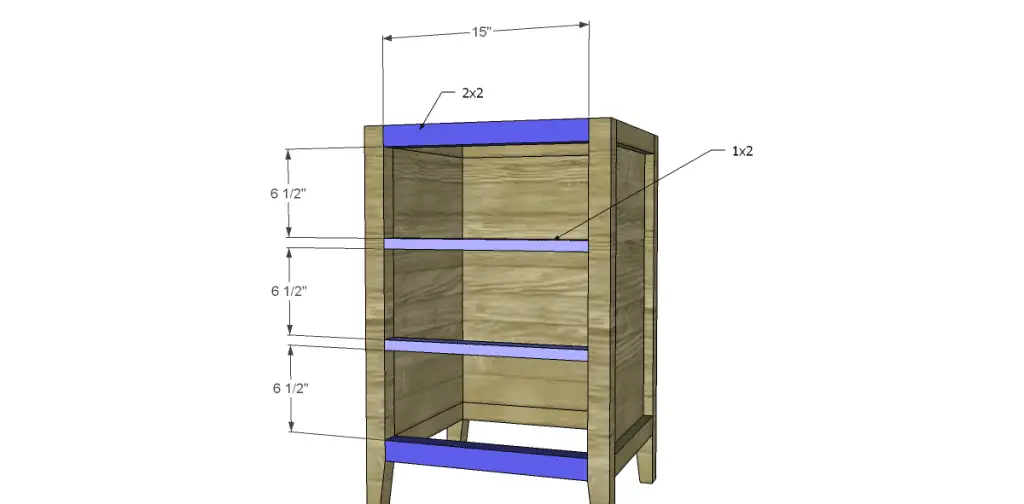
- 4 – 2×2 at 15″ – Back Panel & Front Stretchers
- 1 – 3/4″ plywood at 15″ x 21″ – Back Panel
- 2 – 1×2 at 15″ – Front Stretchers
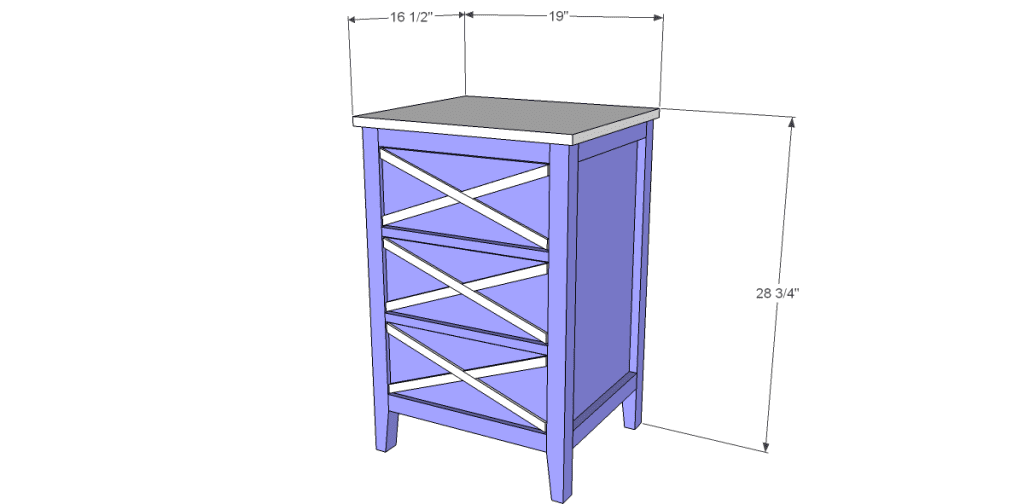
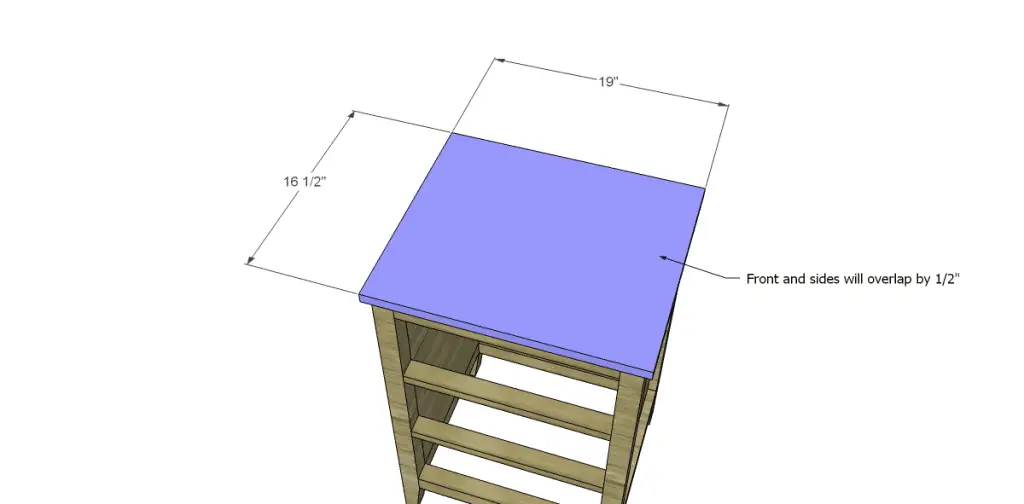
- 1 – 3/4″ plywood at 16-1/2″ x 19″ – Top
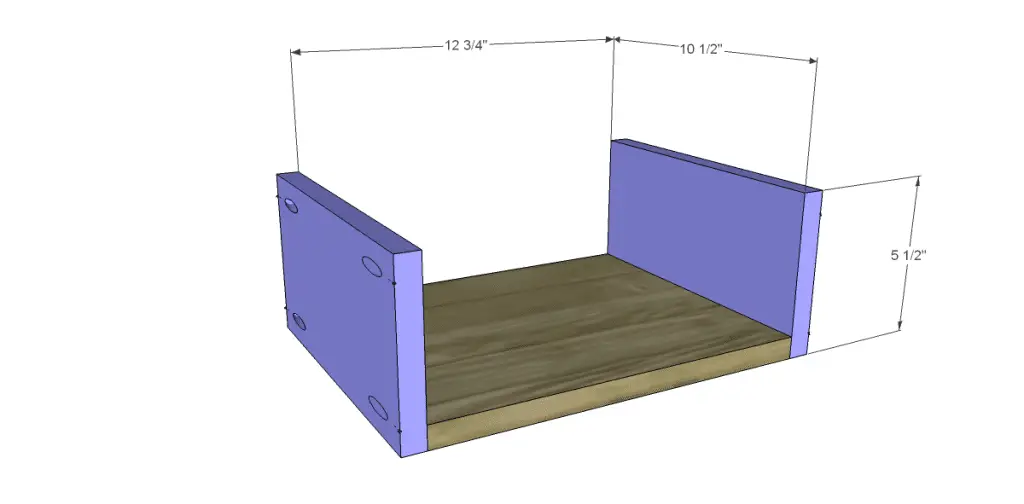
- 3 – 3/4″plywood at 10-3/4″ x 12-1/2″ – Drawer Bottoms
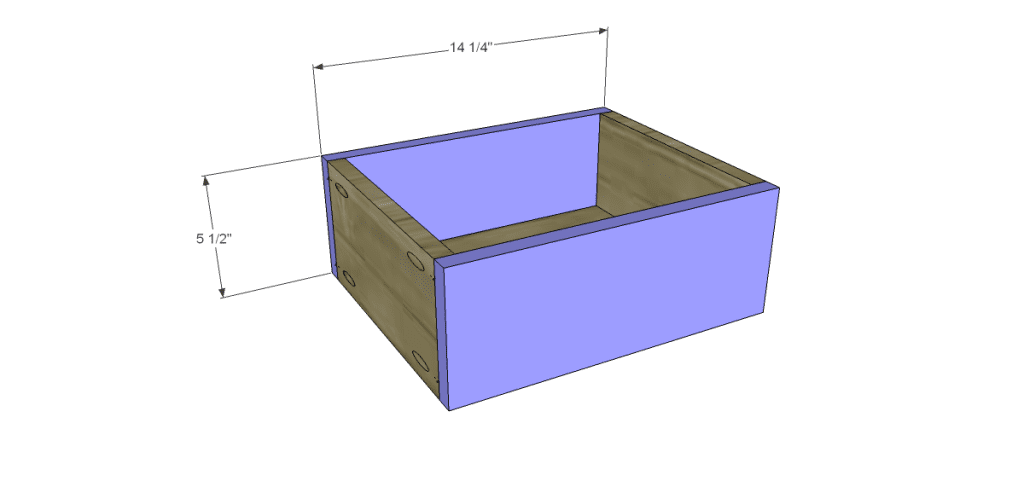
- 6 – 3/4″ plywood at 5-1/2″ x 10-1/2″ – Drawer Sides
- 6 – 3/4″ plywood at 5-1/2″ x 14-1/4″ – Drawer Front & Back
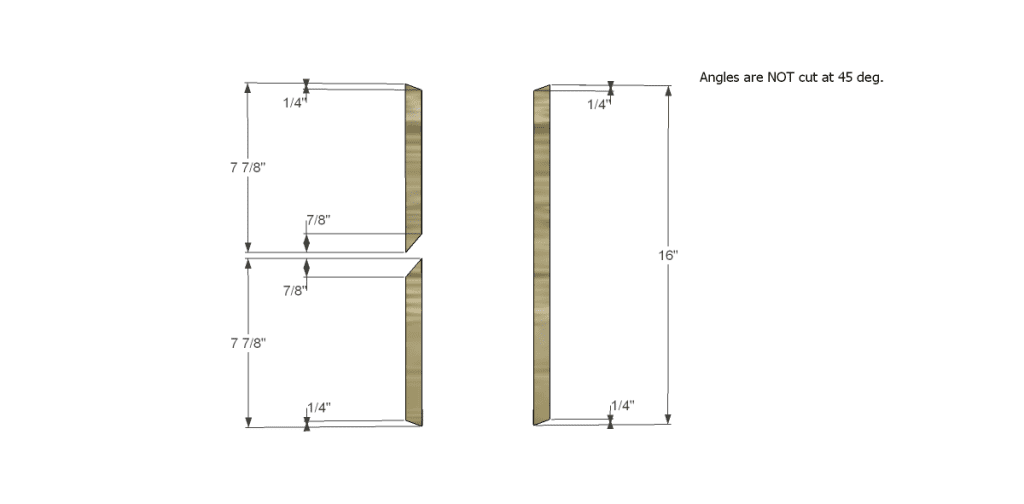
- 6 – 1/4″ craft boards at 7-7/8″ – Drawer X
- 3 – 1/4″ craft boards at 16″ – Drawer X
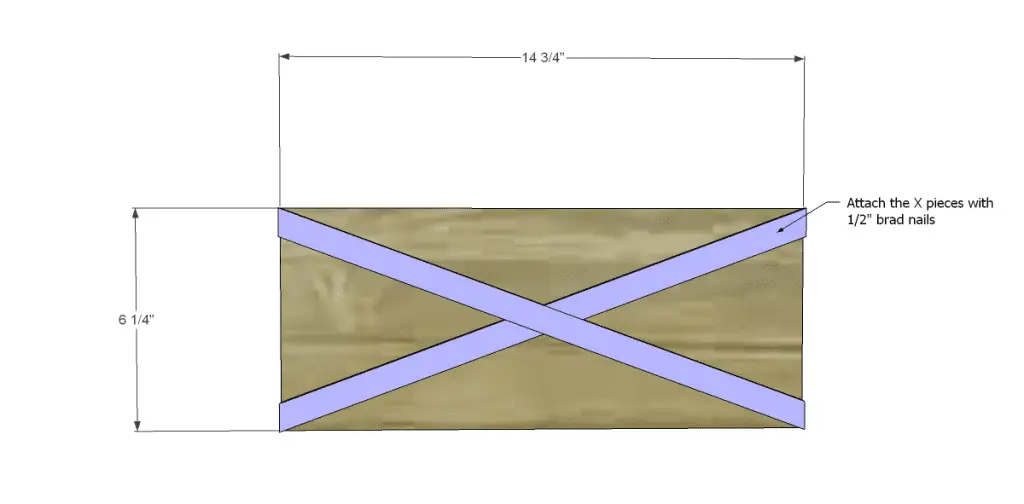
- 3 – 3/4″ plywood at 6-1/4″ x 14-3/4″ – Drawer Fronts
Step One
Edge banding will be applied to the exposed edges of the plywood before assembly.
Cut the pieces for the legs. Cut the taper with a jigsaw or a band saw.
Step Two
Cut the pieces for the side frames and the side panels. Drill pocket holes at each end of the frame pieces as well as all four edges of the panels. Attach the frame pieces to the legs using glue and 2-1/2″ pocket hole screws orienting the pocket holes away from the opening. Position the panel with the back face flush with the inside of the frame, then secure using glue and 1-1/4″ pocket hole screws.
Step Three
Cut the pieces for the back frame and panel. Drill pocket holes at each end of the frame pieces as well as all four edges of the panel. Attach the frame pieces to the legs using glue and 2-1/2″ pocket hole screws orienting the pocket holes away from the opening. Position the panel with the back face flush with the inside of the frame, then secure using glue and 1-1/4″ pocket hole screws.
Step Four
Cut the pieces for the front stretchers and drill pocket holes in each end. Position as shown then secure using glue and 1-1/4″ pocket hole screws through the 1×2 pieces (orienting the pocket holes so they are facing down), and 2-1/2″ pocket hole screws through the 2×2 pieces.
Step Five
Cut the piece for the top. Position on the cabinet with 1/2″ overlapping the front and sides. Secure using glue and 1-1/4″ brad nails.
Step Six
Cut the pieces for the drawer boxes. Drill pocket holes in each end of the sides as well as all four edges of the bottoms. Assemble the drawers as shown using glue and 1-1/4″ pocket hole screws.
Install the drawer slides according to the manufacturer’s instructions, setting them back 1″ from the front edge. Take a look at this easy tutorial on drawer slide installation. Make any necessary adjustments.
 Step Eight
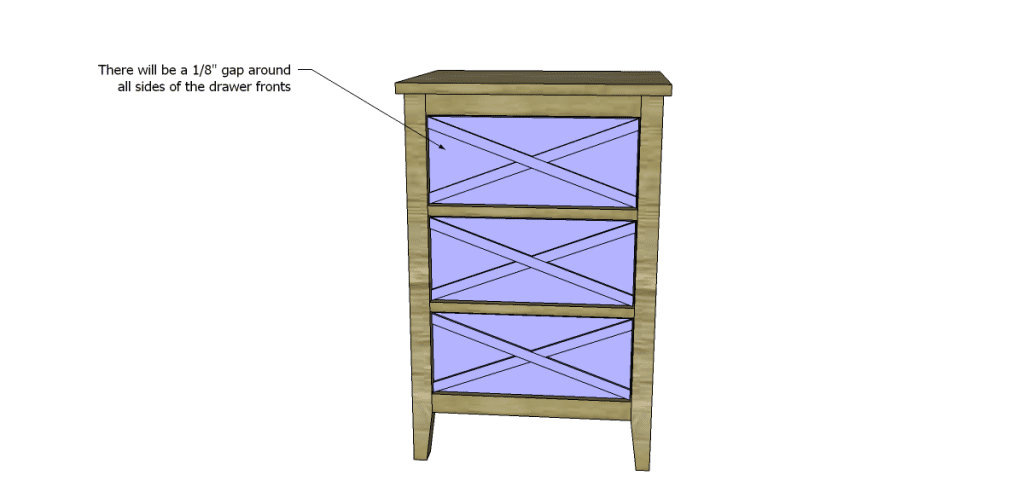
Cut the pieces for the drawer fronts as well as for each X. Note that the angles are not cut at 45 degrees! Secure to the drawer front using glue and 1/2″ brad nails. Drill a hole in the center of each X for the cabinet pull. There will be a 1/8″ gap around all sides of the drawer front in the opening. Shim the drawer front in the opening and drive a screw through the hole for the cabinet pull into the drawer box. Open the drawer and secure the front with 1-1/4″ countersunk screws from the inside. Remove the screw from the hole in the front, finish drilling out the hole for the cabinet pull, then install the pull.
Finish as desired!
These free DIY woodworking plans to build a Sherrilyn Side Table would create a great piece for storage in a bathroom, or in a guest room! Got a project you’ve completed using my plans? Share photos with me at cher {at} designsbystudioc {dot} com or designsbystudioc {at} gmail {dot} com. I would love to feature your build on DbSC!
Originally posted 2013-07-22 08:00:44.
[…] Not only a bedside table, but this little table could be used in just about any room of the home. Build it using this free tutorial. […]
[…] few weeks ago, I posted plans for the Sherrilyn Side Table with criss-cross detailing on each of the three drawers. Today I’m sharing free DIY woodworking […]